
The not-so-short WireGuard Guide for people getting into Homelabbing.

Intro
Homelabbing has become a growing interest for the general public thanks to the growing dissatisfaction of this public with the also growing tendency towards enshittification of the services that the tech sector provides with increasing economic and social cost, but with decreasing benefits and a greater erosion of our consumer rights.
Substituting many of these services with local-hosted solutions and gaining sovereignty back over your own data is one of the main draws towards creating a home lab/home prod environment, but one of its drawbacks is that a local-hosted solution can't be easily accessible from outside the local network or on-the-move like an Internet/cloud based service usually can.
One of the ways this limitation can be overcome is by setting up a Virtual Private Network (VPN) that can provide a connection layer to devices connected across different physical networks that is secure and relatively transparent for the users and applications that need this access.
WireGuard is one of the most complete and effective ways to set up a VPN for your personal or professional use to date. As is actually part of the Linux kernel it's quite performant and resource efficient, that makes it ideal to use both in big servers or small consumer-oriented network devices like home routers or single-board computers. It's designed to be simple in design and structure, modern, secure, and flexible, but due to this simplified design and flexibility it can sometimes be challenging to grasp some of it's more peculiar concepts compared to more traditional VPN solutions. This guide aims to both be easy to follow and complete enough to help you set up your first WireGuard VPN and leave you with enough knowledge to continue your research and experimentation into more complex setups that you may require.
Requirements
- General Computer knowledge: lets be real, setting up a VPN with WireGuard (or even beyond that, setting up a home lab) it's not a starter project for people with low experience dealing with computers or similar devices. This guide will try to explain some basic concepts that are essential to the general understanding of WireGuard, but it will mostly require intermediate to advanced computer knowledge as some of the concepts have to be inferred to keep it within a reasonable length and scope.
- General Network knowledge: the same as above can be said about networking concepts like IP addresses, network classes, routing, DNS resolving, and more.
- At least one of the devices that are going to be connected to the VPN needs to be Linux based, with a kernel version 5.6 or newer, and with access to its console interface with administrative privileges. This guide will assume a Linux environment for all devices in its examples, but client-like devices that connect to the VPN can be from any of the supported platforms like Windows, macOS or Android. No steps will be provided on this guide for setting up a device on non-Linux platforms, but once the concepts explained here are learnt and understood they are easily transferable to all of the client apps in any platform.
- Linux knowledge is expected due to the previous requirement, but the guide will try to explain some basic Linux concepts where it considers necessary for a better understanding of WireGuard in general, but again won't go much in-depth to stay within a reasonable length.
- At least one of the devices needs to have a directly accessible public/external IP address if the VPN intends to connect physically separated devices through the Internet. This address can't be served through a NAT layer set up by the ISP, but the device can be served by a modem/router that has this public address directly assigned and can port forward to this device.
- The general convention in this guide for Linux terminal commands will be showing a terminal prompt (either
#or$), followed by the command to type and enter. The#prompt indicates a command that requires administrative privileges so it can be run as the root user or withsudo. And the$prompt will mean the command can be run with regular user permissions. This convention is used to keep the commands explanations as clear and consistent as possible.
Initial concepts
Home labs have many practical uses and advantageous functions for anyone beyond the learning tool that they inherently are. With the advent of mature self-hosted applications that can take the place of corporate-bound services home labs become home prod environments, providing the direct beneficial independence from big tech companies that constantly increase costs, cripple services, and insert privacy-hostile or so-called "AI-empowered" non-features that benefit no one but the bottom-line of its share-holders.
Having these services and resources available in our house environment is very practical by itself, but we like having access to these many services on-the-move, like say a photo hosting service, a personal media library, or a self hosted browser bookmark management, are all very useful to have available outside our home network, but the options to share these things over the wider Internet can be either insecure or technically challenging.
For example, lets say you have a device that is a Network Attached Storage (NAS) connected on your home network, and you want to access it from a work computer to place a file in it. First you may try to use the available apps and services, like, say try to email this file and hope that not only your inbox has enough space for it but that the email server actually supports attachments of enough size to fit your file. Another common solution is to simply avoid headaches and copy the file to a USB drive and later put the file into the NAS from a home computer. Or maybe use a cloud storage service, like Dropbox, hoping it doesn't go over the limits this service may have for your current plan, and if it's a free plan, hope it also doesn't trigger any privacy issues.
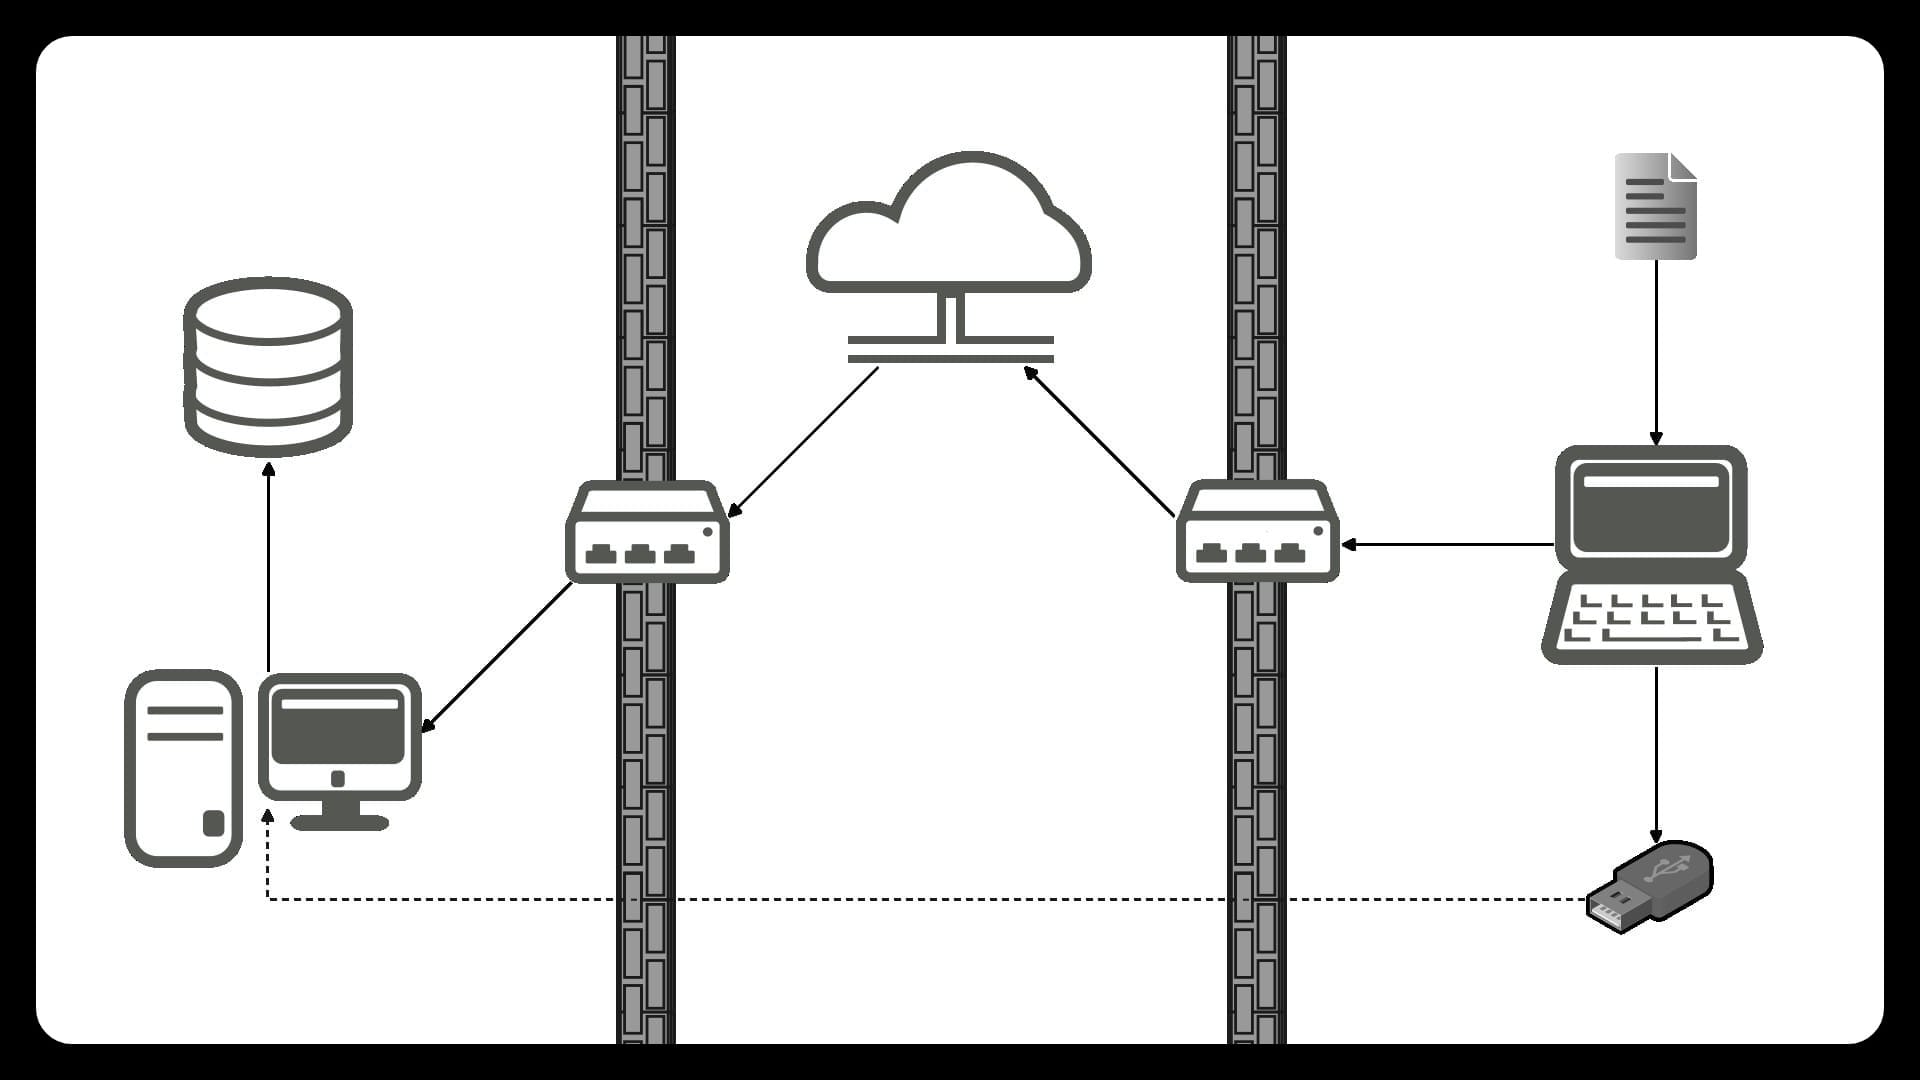
You may think, why not just open access to this one device to the wider internet so you can have access from your work computer? Anyone can tell you that is a very bad idea, even if you can somehow lock access to it by some authentication method like a simple user/password or even something more sophisticated, this approach still remains extremely risky for your home network. Bad actors are constantly on the search for vulnerabilities in your security layers to be able to grab your data or make use of your resources for larger scale attacks on other objectives. There may also be restrictions from your Internet provider (ISP) like being served behind a Network Address Translation (NAT) layer that also prevents a direct link with devices on different networks.
If you think "there must be a simpler and safer way", you are right. In layman terms, a VPN is a whole another network that functions on top of your current separate networks and allows all the devices and services that are connected and accessible in it to function seamlessly as if they were part of the same local network. All this without having to expose your devices and services to the risks of the wider Internet.
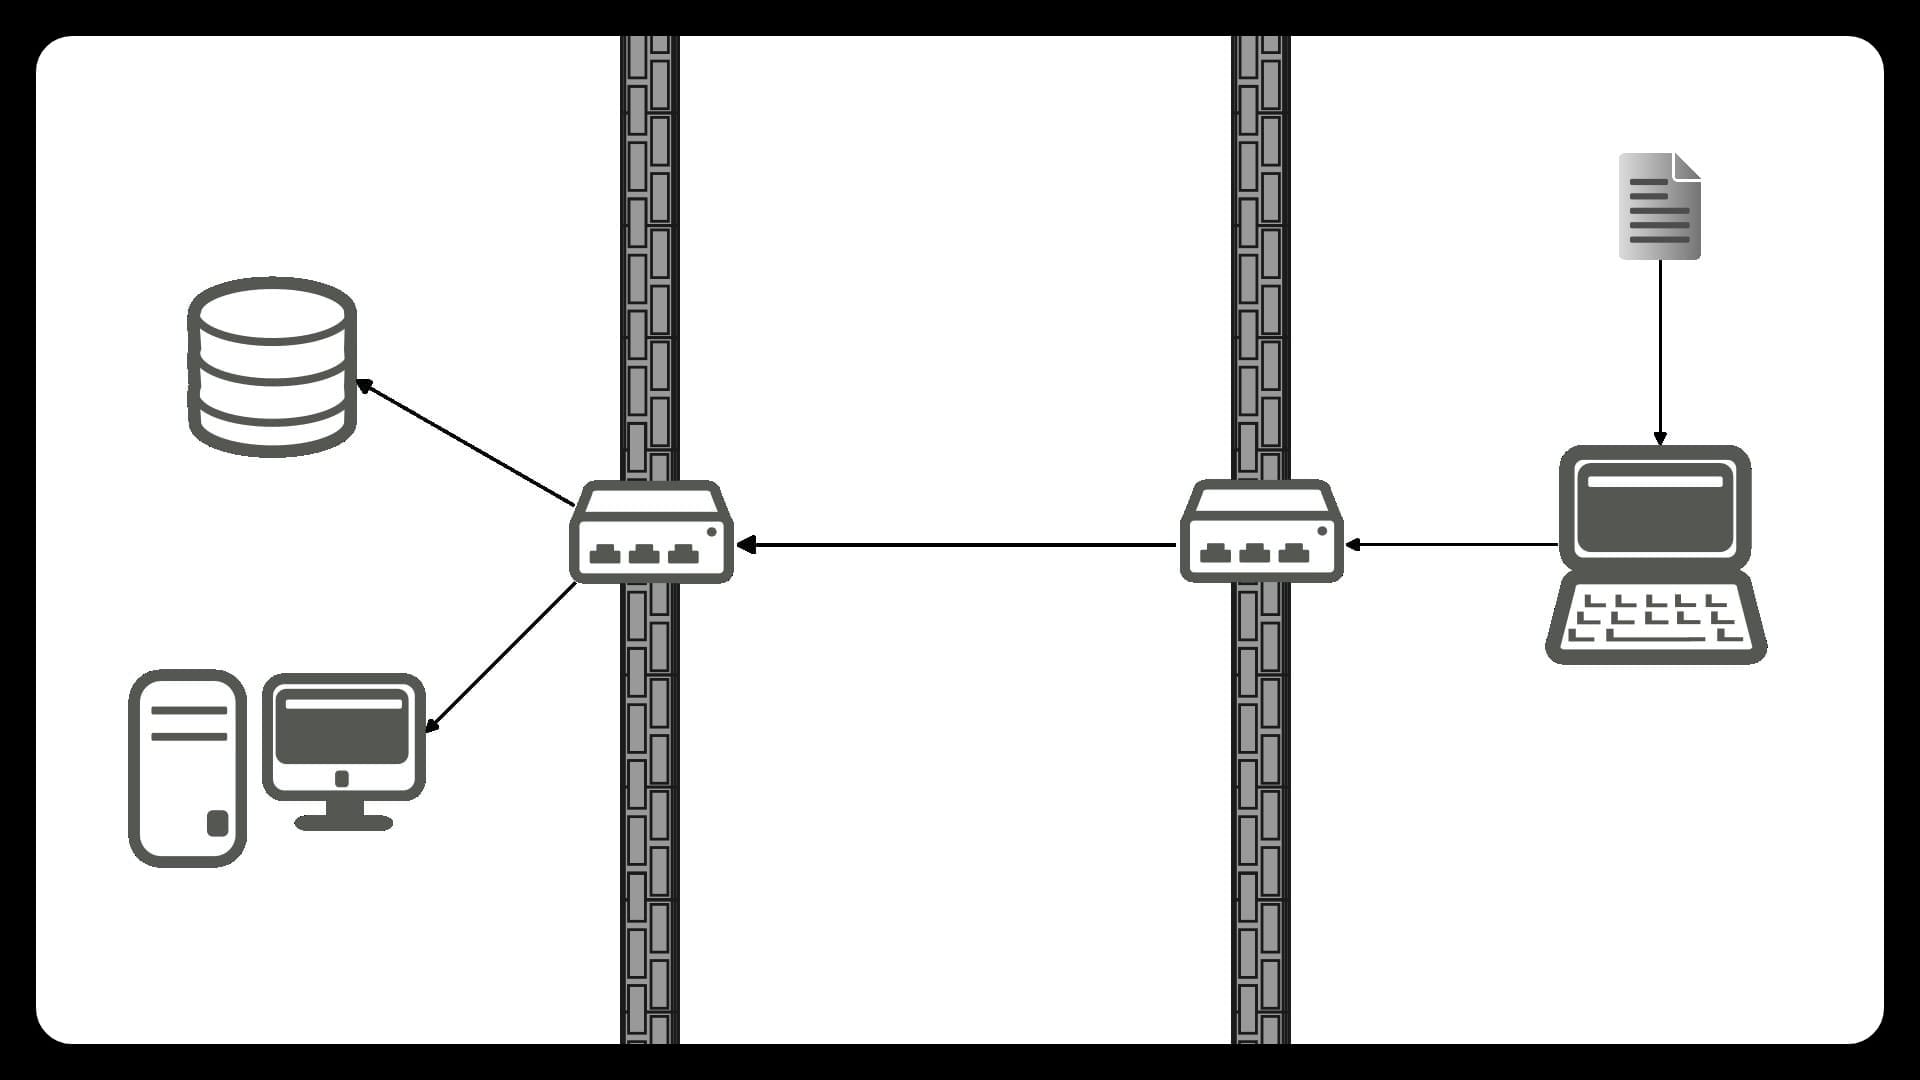
VPNs have been used like this in quite some time and thanks to this there are many VPN solutions out there, based on as many different protocols of communication and security. In fact, if you're an old enough gamer as me, back when player hosted servers where more common, a service called Hamachi was used to connect to friend's game servers and avoid network headaches like open/forward ports, setting up UPnP, whitelist server programs on firewalls, or many other hurdles. Hamachi is just a simple VPN that sets itself up creating a virtual network interface, very similar to what WireGuard does, but since nowadays games with network support are far more likely to provide player lobbies hosted by the game developers or publishers' infrastructure, or maybe even by a trusted third party like Steam, self-hosted game servers have become less relevant, making services like Hamachi way less necessary for gaming.
One big advantage of WireGuard is that by being open source and part of the Linux environment is that is free in all senses, many modern commercial VPN solutions actually take advantage of this and can be WireGuard based. They can streamline and/or automate all the setup steps explained in this guide to create their tunnels with their implementations, and offer other services that work inside these tunnels and take advantage of important WireGuard features like high platform compatibility, great extensibility and scalability, and with its minimal resource consumption and great performance, fit to run on devices with diverse hardware capabilities. One great service like this is Tailscale, which has become very popular with homelabbers, providing many services on top of a full-meshed VPN that integrate well with many common and advanced homelabbing applications. With its flexible and mostly affordable pricing model (they offer 6 seats/users and unlimited devices for its free plan) it's a solid product that could very well be used instead of "pure" WireGuard as a connection layer that allows mostly transparent access on the move and out-of-home locations for most homelabbing applications.
Many home routers where you can install a custom firmware may have the ability to run WireGuard since many of these custom ROMs are Linux based and may already have the proper kernel version needed for that. Learning the concepts from this guide can let you use that knowledge to set up WireGuard directly in your home router, granted its firmware uses a kernel that supports it. And even if that firmware doesn't implement it on it's own interface, if it allows you access to the command line or an SSH terminal, you may still be able to set it up through it, allowing you to have a very flexible setup for your needs.
Initial setup steps
The first step is to install the tools that will let us use WireGuard in our system. From your terminal run:
On Debian : # apt install wireguard
On Arch : $ sudo pacman -S wireguard-tools
On other distributions the package might be named differently or could be split in separate packages, refer to your distro documentation to find out both the package name(s) and the recommended way to install it.
There may be other GUI or CLI WireGuard tools recommended for your particular distro, or even docker solutions with a GUI/Web interface, but to learn and understand the main concepts that build a WireGuard VPN, we're going to try and keep it minimal and go up from there. Also additional tools can create additional points of failure, or may obscure setup steps that are critical to understand, or make troubleshooting more complex as we may don't know if the issue is with WireGuard itself and its setup or the tool we're using.
A terminal text editor is recommended, either vim or nano will work perfectly and usually both are installed by default, with nano being the usual recommendation for users with low Linux expertise. In case they aren't, follow your distro documentation to find out how to install whichever editor you pick. Another personal recommendation for inexpert Linux users would be micro, which has more familiar shortcut bindings for users migrating from other platforms. If you're more comfortable in the GUI, a graphical text editor is perfectly fine, but at least for me, jumping in and out of the terminal to do file edits it's more hassle than necessary, embrace the power of the terminal.
You can verify that WireGuard is properly installed by running the wg utility like this:
$ wg --version
Next step is to verify if the WireGuard kernel module is available:
$ lsmod | grep wireguard
If the previous command doesn't show any output then the module is not loaded. To load it manually run: (note the "#" prompt, meaning admin privileges are needed for the command)
# modprobe wireguard
Afterward, you should be able to get output from the previous verify command. Should look similar to:
$ lsmod | grep wireguard
wireguard             122880  0
libcurve25519         122880  1 wireguard
ip6_udp_tunnel         16384  1 wireguard
udp_tunnel             32768  1 wireguard
Now we're ready to start setting up our VPN.
Generating WireGuard key pairs
WireGuard uses base64 encoded key pairs to both identify peers and encrypt traffic between said peers. It's one of the most basic parts of the setup, but it can be a bit involved process on its own, so we'll give it its own section on this guide.
If you're setting up every device connected to the VPN, it might be better for you to generate all the key pairs you will need for each device in this step, and keep them somewhere safe (especially the private keys that are never supposed to be shared). Later we can transfer them to the other peers by any safe method that we prefer (e.g. ssh, scp, etc.) Since in the current WireGuard spec there is no way to attach any easy to remember label to each peer, I'd recommend to at least name every key file with memorable labels. If setting up more than 3 or 4 peers on your VPN, the key managing may become unwieldy, that is one case that installing another tool for helping with that management may be recommendable, but for basic setups with 2 or 3 peers it's not necessary.
We're going to use the wg utility to generate a private key, On your terminal run:
$ wg genkey > PeerA.key
With this command we're using the wg utility to generate a private key and redirect the output to a file with a name PeerA.key. As with most Linux files, you don't really need an extension, but can help to make it a bit more identifiable, Like we previously recommended, we can use as descriptive names as we need it, e.g. HomePCprivate.key or CharlyPrivateKey.
Next we're generating the public key from this private key file:
$ wg pubkey < PeerA.key > PeerA.pub
Again, we're not forced to use the .pub extension by anything, you can name both files whatever you need to make them more identifiable.
We can run a single command line to do everything at once like this example using a different naming convention for a second peer:
$ wg genkey | tee PeerB_Private.key | wg pubkey > PeerB_Public.key
Optional: If you're really security conscious, you can also generate pre-shared keys for each peer machine pair, that will add another encryption layer that is allegedly post-quantum resistant. For example in a network with three peers you can generate:
$ wg genpsk > PeerA-PeerB.psk
$ wg genpsk > PeerB-PeerC.psk
$ wg genpsk > PeerC-PeerA.psk
As mentioned, the more devices you add to your VPN it will make key management more difficult. For this guide we will use only the general key pairs, adding pre-shared keys is trivial after setup if you want to generate them later, we will at least provide an example if you want to use them, but these can otherwise be ignored unless you feel the need for the added security.
Manual setup with the 'ip' and 'wg' utilities
For our first example creating a WireGuard VPN we will do a manual configuration with the ip utility that's core part of the Linux operating system, and the wg utility that's part of the WireGuard tools that we installed in the first steps of this guide. For this first example we're using the simplest premise that both devices may or may not be in the same physical network. If they are in the same network and we are trying to setup a test VPN we can use their internal private addresses as their "external" IPs and other set of private addresses on a different block or sub-network for the VPN. But if they are connected through the Internet, we assume in this example both have individual public addresses, and are not behind either a firewall or a NAT set up by their providers. An "ideal" setup, only to explore and learn the very basic WireGuard concepts, we will explore more complex setups and examples in this guide as we follow along.
We will start with the following command:
# ip link add dev wg0 type wireguard
With it, we're telling the ip utility to create a new virtual network interface device named wg0 of the WireGuard type.
Remember that on Linux, usually successful commands will return no output. If you had an error output, first remember that the # prompt means you need root privileges, either run these commands as root or sudo them. If you get other error despite running it as admin, check the command you entered for typos and also make sure the WireGuard module is loaded like we explained in the initial setup steps.
If no error is returned, you can continue with:
# ip addr add 10.0.0.1/32 dev wg0
Here we're telling the ip utility to assign the 10.0.0.1/32 address to the wg0 device. If you don't know why I picked that address in particular, to simplify I'll tell you that big-brained network honchos decided to leave some address blocks only available for private networks to avoid needing a public Internet address for each device that may not need it. One of these was the range that goes from the 10.0.0.1 to the 10.255.255.255 address (which we would represent with the 10.0.0.0/8 notation). Since it's the largest of these blocks, and it's not normally used by default by the large majority of consumer devices such as home modems and routers, setting up a sub-network from that block is usually safe from conflicting with other existing network configurations. Other private address ranges are also safe to use, so you can adjust this guide for the one you prefer to use, if you have enough network knowledge to do that, just stay within the RFC 1918 space. You may notice too on the address the /32 suffix, this is using the CIDR notation which basically is saying to the ip utility this address is unique to this device.
Next we will further configure this peer, now with the wg utility:
# wg set wg0 listen-port 51820 private-key /home/myuser/PeerA.key
This command will make the wg utility to set the 51820 port as a listening port on the wg0 device we created with the ip command, and also to use the private key file we generated earlier in this guide and look for it in the directory we saved it in, for this example we assume it's saved on /home/myuser/. If you just ran the generation commands in the console after opening it without changing directory, the most likely place they are located is the home directory of the user we're logged into.
Notice we're using the private key here, the public key will be used in the other peers setup. This is similar to how key pairs are used in SSH, but here instead of being a client/server architecture, WireGuard considers both devices as peers and both will use their key pairs, the private key for the current peer and the public key to identify the other peers.
The 51820 port is the usual standard port for the WireGuard protocol, and will default to that if not specified, but we are not forced to use it. We can use any unassigned port we might like, if only to avoid hostile port scans that might go looking for well known standard ports that our system might have open.
Next we're going to add the definition for the other peer we're trying to connect with the wg command:
# wg set peer oDui8rYsV36vnIj1RiwwtzOfXSDoQvKMb3LtxE49WNUI= allowed-ips 10.0.0.2/32 endpoint 192.168.122.245:51820
With this command, the wg utility will identify the peer B with the contents of the public key file we previously generated. For this example, if we generated this file with the PeerBPublic.key name, we can easily read this with a simple $ cat PeerBPublic.key command and copy/paste the output in the previous line instead of the oDui8rYsV36... placeholder.
The allowed-ips 10.0.0.2/32 part of the command is of particular importance due to not only being part of how the virtual device identifies the peer, but also because WireGuard uses this information to decide the routing between peers. For a simple point-to point connection between this two peers, the /32 CIDR suffix establishes that for this example, any packet that is identified with the public key of the peer B, will be authenticated and accepted on the peer A only if it explicitly comes from the 10.0.0.2 address. We will show further down this guide other examples of how the Allowed IPs setting is used by WireGuard for more complex setups.
The endpoint definition is also important to understand, for this example is assumed for the two peers that their "real" IP address (the address that it's not assigned to use in the virtual network) is directly reachable. Either by being part of the same network/subnet block, or if they're connecting through the internet, their external IP addresses are directly assigned and not mapped through a NAT layer. This is essential to how WireGuard can make devices that are on separate networks act as if they were part of one, the endpoint is how the data transmitted through the virtual network finds its way through the "real" networks. For this "ideal" simplistic example (or a test inside a private network) this is good enough, for more complex examples, it is safe to assume that thanks to how the WireGuard protocol was established, as long one of the peers has a directly reachable address by the other peers, a VPN connection can be established. So for this example we'll use that address and the WireGuard listening port we declared earlier as their endpoint instead of the 192.168.122.245:51280 placeholder.
Finally we bring up the virtual device with:
# ip link set wg0 up
The second peer configurations would be similar. In the terminal of the second computer we would enter something like:
# ip link add dev wg0 type wireguard
# ip addr add 10.0.0.2/32 dev wg0
# wg set wg0 listen-port 51820 private-key /path/to/PeerB_Private.key peer IDxkA0UyGUUxPeV10jKbVmhblGUcoR1h0NDGQiIr0lE= preshared-key /path/to/peerA-peerB.psk allowed-ips 10.0.0.1/32 endpoint 18.51.256.101:51820
# ip link set wg0 up
Notice you can use a single wg command line to define our own private key settings and adding the peer we're trying to connect to. I separated them in the first peer's example to be able to have a deeper examination of each, and also help to prevent typos in longer command lines, but both ways work the same. Both the IDxkA0Uy... key and the 18.51.x.x address in this example are just placeholders, when setting up your second peer you should put the content of your first peer public key file and the proper public IP address.
Also in this second peer example we're showing the way we would add the pre-shared key we could use for added cryptographic security. If we decide to use it, we need to set it up on both peers, so the preshared-key path/... part of this line would also need to be added in the first peer configuration.
For simplicity's sake, we are also declaring the supposed external 18.51.256.101 "address" as the endpoint address for the peer A since we presumably know it's external address and we know it's reachable, but in reality thanks to the WireGuard protocol definition is technically not needed as long as the peer B's endpoint definition is valid (and vice-versa).
At this point, you should have a working tunnel, and if you ping each peer with the internal IP address you configured, you should see an output similar to the following:
$ ping -c 3 10.0.0.2
PING 10.0.0.2 (10.0.0.2) 56(84) bytes of data.
64 bytes from 10.0.0.2: icmp_seq=1 ttl=64 time=7.72 ms
64 bytes from 10.0.0.2: icmp_seq=2 ttl=64 time=7.32 ms
64 bytes from 10.0.0.2: icmp_seq=3 ttl=64 time=7.46 ms

--- 10.0.0.2 ping statistics ---
3 packets transmitted, 3 received, 0% packet loss, time 2002ms
rtt min/avg/max/mdev = 7.316/7.500/7.724/0.168 ms
If you run the wg command without parameters it should give a summarized view of the configuration similar to:
# wg

interface: wg0
  public key: IDxkA0UyGUUxPeV10jKbVmhblGUcoR1h0NDGQiIr0lE=
  private key: (hidden)
  listening port: 51820

peer: oDui8rYsV36vnIj1RiwwtzOfXSDoQvKMb3LtxE49WNUI=
  endpoint: 18.51.256.101:51820
  allowed ips: 10.0.0.2/32
  latest handshake: 5 seconds ago
  transfer: 1.24 KiB received, 1.38 KiB sent
The need to run this checkup command with admin privileges is clear when you consider it is showing the public key contents in plain text, while it's not as bad as leaking the contents of the private key, it's still sensitive information.
We can bring down the whole connection on each peer with a command like
# ip link delete dev wg0
This command will cleanly delete the virtual device, no configuration file is modified or generated to be left behind. And to recreate the setup we would need to run again the whole list of commands we just did.
Now that we did a manual configuration and understand some of the concepts of a simple VPN tunnel we can proceed to use another WireGuard tool to achieve a couple of things. The first one would be to have an easier set-up and tear-down process for our VPN based on a simple configuration file, and the second would be to have a persistent setup that can load on every system boot-up.
Quick configuration using 'wg-quick'
In this section I'm going to present another case that is a bit more complex. In this example we're going to have a peer "A" that has a public address assigned by its ISP, but for peers "B" and "C" their ISPs have them behind a NAT. As we explained on the previous example, for the VPN to work we're gonna need to setup the one peer that has a public address as our endpoint peer.
We will start by creating the configuration files that the wg-quick script will be able to interpret to bring up the tunnel with a single command. If we have a working configuration that we setup manually like our first example, we can use wg with the showconf option to see that configuration output in the format that wg-quick can understand. For example let's say we already configured manually our peer A with both other peer definitions, then we can type:
# wg showconf wg0
And that would give an output similar to:
# wg showconf wg0

[Interface]
ListenPort = 61639
PrivateKey = QEps19lj3TVHDWzbDyksudhjJ5t1R1TPTPTt62xaC0Q=

[Peer]
PublicKey = wFsOI8KzQRiZDrER1nlm8/SDUFsdfglWOr3LTWov2UA=
AllowedIPs = 10.0.0.2/32
Endpoint = 189.149.256.111:61639
PersistentKeepalive = 25

[Peer]
PublicKey = GDUj2ng5ai+0e766Pw5bf9TbPLGzpWxm/fOibHFYgWQ=
PresharedKey = qiNgnG7Ql+yCtx73Ucyc/ftsyL4FfRpSwmzCVDtl5DQ=
AllowedIPs = 10.0.0.3/32
Endpoint = 189.149.256.111:61639
PersistentKeepalive = 25
Here we can start picking apart the basic structure of what would be a regular configuration file (remember that the keys shown are placeholders and will not work as is, you need to generate your own keys and substitute them in your configuration):
- The
[Interface]section will provide the configuration needed for the WireGuard interface on the current machine we're trying to setup.ListenPortis, as expected, the UDP port the interface is using to listen for incoming connections.PrivateKeyis going to be the plain text contents of the private key file we created with thewgutility for the current peer we're setting up.
- Each of the
[Peer]sections is going to provide the configuration data for the other peers we're trying to connect to through the WireGuard tunnel.PublicKeyis the plain text public key of this section's peerPresharedKeyis the optional key we can generate for increased cryptographic security of a peer pair. Remember that if you're going to use it, you need to use the same key in the configuration of the other side of the pair.AllowedIPsis, as we saw in the manual configuration, both the way the interface is going to identify the peer, and also decide which routing capabilities it has. Notice we are still using the direct addresses with a/32suffix in this example and I'll further explain why in a bit.Endpointis, as we mentioned, the public IP that every peer must be able to reach on the wider internet. In this example, our peer A is the only machine with a public IP address not served through a NAT layer, so we're going to use that for every peer configuration.PersistentKeepaliveis a new setting, necessary if the peer is connecting to the internet from behind a NAT. Since WireGuard is a passive connection that only "wakes up" when receiving data packets, NAT configurations for ISPs usually time out if they're not actively transmitting data. The keepalive packet is very small to not affect bandwidth but enough to prevent this timeout, if we happen to somehow know the timeout settings for our ISP we might be able to tweak this setting but 25 seconds seems to be a very widely applied and functional setting, so I wouldn't change that number unless we keep getting our WireGuard connection drop the peers behind a NAT despite having this setting which would mean we need to reduce the number of seconds.
So if we already have a manual configuration in place we can just simply type in the console:
# wg showconf wg0 > /etc/wireguard/wg0.conf
This will simply redirect the output of the wg utility into a wg0.conf file inside the /etc/wireguard directory. This is a default directory that should have been created by the WireGuard installation process. The filename does not require to be called wg0, as mentioned before this is just the usual convention for naming WireGuard connections/devices, but we can use more descriptive names if needed like wireguard1, TunnelHome0 or something like that. In this particular step, the file does need to have a .conf extension, because when we try to bring up the tunnel in the next step, wg-quick will look for a wg0.conf file at the /etc/wireguard/ directory.
There is one change that we need to do before using this file, so we will open it with our editor of choice and add the Address setting inside the [Interface] section like this:
[Interface]
ListenPort = 61639
PrivateKey = QEps19lj3TVHDWzbDyksudhjJ5t1R1TPTPTt62xaC0Q=
Address = 10.0.0.1/32

[Peer]
...
In case we don't already have a working configuration created manually, we can also copy the above example and paste it on a blank file and follow its structure easily to edit and add the necessary information like correct VPN and real IP addresses, and the private and public keys of our peers to have a functional configuration. Then after we save the changes we can use that file whenever we need to bring the WireGuard tunnel up with wg-quick. Before testing this configuration file remember to bring down the manual configuration, if we have one, with a command like # ip link delete dev wgdevicename. Then we can run the wg-quick tool like this:
# wg-quick up wg0
At this point it's also necessary to stress the importance of good security practices for the files we're generating in this guide. You might have noticed that almost all of the commands that I've been using since starting the proper configuration steps must be run with administrative privileges. It is also necessary to point out that most of this tools usually won't even accept reading files that don't have the restrictions needed to keep sensitive information safe. For most of the files it is expected for them to be only owned by the root user and be only read/write accessible by it. The same is also expected of the /etc/wireguard directory, so now is a good time to make sure of that, a simple # ls -la /etc/wireguard should show a similar output to:
# ls -la /etc/wireguard
total 12
drwx------ 1 root root   84 jun 18 18:01 .
drwxr-xr-x 1 root root 2878 jun 18 18:40 ..
-rw------- 1 root root   45 abr 24 22:59 thisPeerPrivate.key
-rw------- 1 root root   45 abr 24 22:59 thisPeerPublicKey.pub
-rw------- 1 root root 1731 jun 18 18:01 wg0.conf
The first line of the listing is the one referring to the actual permissions of the /etc/wireguard directory, the part that starts with drwx tells us that it is a directory, and that it is only readable, writable and executable (in a directory's case, opened) by the root user. If this line looks in any way different, to fix it we should run a command like:
# chmod 700 /etc/wireguard
The second line refers to the previous directory in the structure, in this case /etc, since that one is far more general than /etc/wireguard it's not a problem if it has read and open permissions for other users than root so the part of this line reading drwxr-xr-x is OK, we shouldn't worry about it.
The next three lines are examples of the files than we could expect to find in this directory. If you have been closely following this guide, then you will not find the private and public key file pair you generated at the beginning here. Because we both ran the generation commands as a regular user, and we never told the wg utility to generate them in this system directory. We were mostly directly reading its contents to paste them in the commands we used, but if we want to have a safer organization of these files, we could move them here with a command like:
# mv /home/myuser/testPeerA.key /etc/wireguard/
Again remember this is a system directory that we just made sure only the root user can access so, as indicated by the # prompt, we run this as root or with sudo. /home/myuser is a placeholder for your own user home directory so just substitute myuser for your own username, or change /home/myuser for whichever was your working directory when you generated the key files.
After moving the files we just make sure only the root user can read/write to them with:
# chown root:root /etc/wireguard/*
# chmod 600 /etc/wireguard/*
Since these two commands will apply to every file we have inside the /etc/wireguard/ directory, the wg0.conf file we created before should be safe now too.
For the other two peers since they are only having a point-to-point connection with the peer A, they just need a simpler configuration like the following:
[Interface]
ListenPort = 61639
PrivateKey = YI1idoFf7/8s/Tli/dgITIaQmQsqQ7bpQZOowlu59nw=
Address = 10.0.0.2/32

[Peer]
PublicKey = sMGuPQLDitdsKP/F62HKvNEkSaOPSWDku9V76qyUw=
AllowedIPs = 10.0.0.0/24
Endpoint = 189.149.256.111:61639
Going into more detail about the AllowedIPs setting: For most people, the name could imply an address or list of addresses the peer is allowed to use, that is how it usually works in most networking. But in WireGuard most of the identifying or, more properly, the authentication it's done by the key pairs we have set up for each peer. AllowedIPs is more of a setting that defines the range of IP addresses that the peer can route traffic to. For this example, point-to-point connection between the two peers behind a NAT is not possible, then connections will be point-to-point only to the peer A that will act as a bounce server for the other two peers, meaning connections from peer B to peer C will only happen through peer A. Note that for the AllowedIPs setting of our bounce peer A we're now using a definition for the 10.0.0.0/24 subnet that goes from 10.0.0.1 to the 10.0.0.255 address. In essence we're telling WireGuard that the peer A will be routing packets from every address in that subnet, as we need it for peer B and peer C to be able to communicate like we explained above. We can always use specific IP addresses here to have a stricter routing between peers, that can be used to resolve some subnet conflicts, as specific address definitions take priority routing over subnets. For this example we could use a setting like AllowedIPs = 10.0.0.1/32, 10.0.0.2/32, 10.0.0.3/32 for the peer A definition in peers B and C configuration files, and that is functionally the same as using AllowedIPs = 10.0.0.0/24, with the latter being advantageous if we later add more peers to this setup, as we won't need to add the new peer addresses to the AllowedIPs setting as long as they stay within the same subnet space.
For WireGuard to be able to properly route packets for peers B and C, we will also need IP forwarding to be enabled in the peer A. We can check the current status of this setting if we enter the following line on the peer A terminal:
$ sysctl net.ipv4.ip_forward
The output will tell us this setting has either a 0 or 1 value, if the value is 0 means it's not enabled so then we can temporarily enable it with:
# sysctl -w net.ipv4.ip_forward=1
To enable it on boot we would add or uncomment the following lines in /etc/sysctl.conf, or create a new file in its drop-in directory like for example /etc/sysctl.d/99-packetforward.conf with the lines:
net.ipv4.ip_forward = 1
net.ipv4.conf.all.forwarding = 1
Then we can reload the config files with a command like:
# sysctl --system
We can verify the status again with $ sysctl net.ipv4.ip_forward and if the output shows a value of 1 then we can proceed with the next step.
Since packet forwarding without a properly setup firewall is considered a security risk, this is a time as good as any to present an example of firewall configuration that can work with WireGuard. Uncomplicated Firewall (ufw) is my preferred way to configure a firewall with its simplified syntax, as a front-end for a firewall with a more complex syntax like iptables or nftables. It's usually installed by default on Debian and is commonly available on other distros. But if you're used to dealing with iptables directly, then you most likely don't need this guide to tell you how to configure it manually, but many other WireGuard guides will give some leads if needed.
First we can verify ufw's status with:
# ufw status
If we get an inactive status we can first set up our configuration before enabling it. Note that if you're currently using an SSH session to configure this peer you will also need to allow the SSH port before enabling the firewall so you don't get disconnected from the session and be unable to log back in, effectively locking you out from remotely accessing your device and having to access it physically.
First step is to open the port that WireGuard is going to use, in this example we're using port number 61639, so then we enter at the console:
# ufw allow 61639/udp
Next we're going to allow the packet forwarding we've just enabled:
# ufw route allow in on wg0 out on eth0
Next we're configuring some NAT rules of our own for the VPN traffic. For this we're using our editor of choice to open the /etc/ufw/before.rules file and add the following lines at the top:
# NAT table rules
*nat
:POSTROUTING ACCEPT [0:0]
-A POSTROUTING -s 10.0.0.0/24 -o eth0 -j MASQUERADE
COMMIT
We're ready to enable our firewall, assuming we also have configured it for any other networked service we're using in this device, like SSH (if we're using the default port a simple # ufw allow ssh is all it needs). So we just need to run:
# ufw enable
If this is the first time ufw is running then we also need to start and enable its service unit to load at system boot:
# systemctl enable --now ufw.service
In the case that ufw was already running we will need to reload it for the masquerading before-rules to be active:
# ufw reload
There is one more step needed to achieve a persistent WireGuard configuration that will load on every boot, and that is to enable its own service unit, of which every virtual device has its own. So every service unit follows the naming convention wg-quick@interfacename.service. In this example since were using wg0 as our interface device name we would enter:
# systemctl enable wg-quick@wg0.service
wg-quick is a simple, general tool that basically wraps calls to the ip and wg utilities, and it's configuration files are way more readable that a bunch of console commands. It can also add a few values like DNS servers lists and even some script snippets to be executed before and after the virtual interface is brought up or down. That flexibility makes it by far one of the most recommended ways to set up a WireGuard tunnel for almost everyone. It is a good general tool for most users that have simple needs, but for more specific cases with more advanced requirements, even the documentation will recommend to either keep using ip and wg, or use a network manager that supports WireGuard. One of them is the aptly named NetworkManager, and it's a bit ubiquitous on many distros, so our next example will be using it.
Setting up a full VPN tunnel with NetworkManager
When we route through the VPN our entire network traffic, including our Internet traffic, that is defined as a full tunnel. So far we've split the VPN traffic from the rest, doing point-to-point connections only to each VPN peer we've configured, but there are use cases for a full tunnel, like to navigate the wider Internet only through the VPN, which will encrypt this traffic and in effect show only the external IP of the Internet sharing peer. This is usually the main service what commercial VPNs offer, so by doing it ourselves we're getting most of the benefits from a commercial VPN with the added one of keeping full control of our data. Of course, without access to multiple network outbound points in different locations around the world like the commercial VPNs have, we can't use this to bypass geographic locks.
High availability would be a common necessity of a peer providing Internet access for the VPN, so configuring it with NetworkManager has many advantages over using only the default tools, like requiring low amount of manual intervention, access to other configuring tools that make use of the NetworkManager API, access to the DNS resolving stack through it, etc.
As previously mentioned NetworkManager can be available out-of-the-box on many modern desktop installations like Debian/Ubuntu Desktop, Fedora, Mint, etc. But server and minimal installations may be functioning with a different stack and may need for NetworkManager to be installed. Before installing NetworkManager on a system that doesn't have it installed by default make sure you understand the changes that you'll need for your other network connections configuration, your distro should have extensive documentation for installing and setting up NetworkManager if it's supported.
Similarly to the other tools, there are two main ways to setting up a WireGuard tunnel with NetworkManager, manually or importing an existing config file. We will explore both methods and its advantages and disadvantages. While some desktop installations that use NetworkManager by default may ship GUI tools for creating a new connection, we're sticking to the command line utility nmcli since it's still the most consistent method to avoid weird setup issues.
NetworkManager uses "profiles" to set up network connections, to create a new profile for our tunnel we're going to write in the console:
# nmcli connection add type wireguard con-name wireguard-tunnel ifname wg0 autoconnect no
With this command we're telling NetworkManager to create a profile of the WireGuard type named wireguard-tunnel, with an interface named wgo, and to not automatically bring up this connection after it's created, to allow us to add some configuration information beforehand. We will continue with:
# nmcli connection modify wireguard-tunnel ipv4.method manual ipv4.addresses 10.1.1.1/24
Here we're assigning the VPN address and subnet mask we've chosen for this example in this connection profile. We're establishing a manual method to assigning this address, that means this address will be static so it doesn't erroneously try to get an address from a DHCP server that we might have in our network, like say from our home modem/router. Next we enter:
# nmcli con mod wireguard-tunnel wireguard.private-key "aMnnbbA8g11if27aLvBfh7xy1fi6GGAWrLlR4Fj6qkM="
The nmcli utility allows for some shorthand using the first three characters of their options in the commands we type, so in this example nmcli con mod is the same as nmcli connection modify, check your online documentation or the nmcli man pages for more examples on how to abbreviate nmcli commands. Besides that, this command tells NetworkManager to assign the private key inside the quotation characters to our profile.
# nmcli con mod wireguard-tunnel wireguard.listen-port 45731
Next we're assigning the listen port number 45731 for this peer configuration example.
The next step is probably the worst disadvantage to doing a manual configuration with nmcli, and that is adding the peers configurations. Currently all of the peers have to be defined in a single setting field, and using this manual method only allows for a single command, there is no way to later add new peers, a new command line with all the peer definitions in it has to be issued, which of course for anything more than a couple peers can be unmanageable and very error prone unless we're using it in some automated script. Still, let's say our full tunnel will serve a couple peer devices:
# nmcli con mod wireguard-tunnel wireguard.peers "bnwfQcC8pg6i3tvEqcGin4u7gi3Mskk6G9t4r26nFVM= allowed-ips=10.1.1.2/32 endpoint=mywireguard.ddns.com:45731 persistent-keepalive=25, JfILmlky/0Hj8A69CwRh4NHudB5hJHe/OM8SgvlkTns= preshared-key=sB9JfertiHPPGILltfstRz3n1vWTqfHdj+pJE56ituE allowed-ips=10.1.1.3/32;10.1.1.0/24 endpoint=mywireguard.ddns.com:45731 persistent-keepalive=25"
As we can see, we need to add a single text string inside quotation marks with all of our peer definitions, options space separated, and each peer separated by commas. And you better type it right the first time or you will need to retype the entire string again for any correction or addition. This is a limitation of the nmcli utility that can be worked around with third party scripts or GUI/TUI tools that may be part of your distro implementation of WireGuard and NetworkManager, and every option is more or less an inconvenience that will not be solved until a more robust solution is implemented on nmcli itself. Fortunately, as with most things in Linux, there's also the option of directly editing the profile configuration file, which is probably the least inconvenient option, and we will explore that further down this guide. For now, we continue the manual configuration with:
# nmcli con mod wireguard-tunnel autoconnect yes
Here we're simply telling NetworkManager to auto start the connection whenever NetworkManager starts, usually on boot. This is optional, and we can bring the connection up or reactivate it anytime with:
# nmcli con up wireguard-tunnel
We can verify that our tunnel is up and its configuration in the usual way with wg show and wg showconf, but we can also do a check with:
$ nmcli con show
That gives us a quick list of our active connections with an output similar to:
$ nmcli con show
NAME                UUID                                  TYPE       DEVICE
Wired connection 1  d866cd69-5d33-3ca1-93c0-d837f8e628c4  ethernet   enp1s0
wireguard-tunnel    adhf8673-67aw-90we-a5a5-dbd64480ae8c  wireguard  wg0
lo                  dfg89dfg-fd76-f9d8-00s8-86a65c65d0d5  loopback   lo
If we want detailed information of our connection profile we can do:
$ nmcli con show wireguard-tunnel
This will give a multi-page output with all of the NetworkManager settings of this profile which can be helpful for troubleshooting, if not a bit overwhelming at first glance.
For the next peer we will make use of the importing function of nmcli that makes use of the .conf file we used in the previous example with wg-quick. So assuming we have a wg0.conf file inside the /etc/wireguard directory, or perhaps creating a new one from scratch using that example as template, we would run:
# nmcli con import type wireguard file /etc/wireguard/wg0.conf
This will create a profile with the same name as the .conf file. Having done this the only thing needed to bring the connection up is to use the same #nmcli con up command that we used at the end of the manual configuration but with the wg0 name in this example.
But before bringing the connection up is good procedure to edit or output the NetworkManager configuration file first and verify the settings imported correctly. We will find this configuration file inside the /etc/NetworkManager/system-connections/ directory and they'll have the same name as the one we set up manually or the one imported from the .conf file, and they'll have the .nmconnection extension, so in case we want to see the contents of the profile file we just generated we could type something like
# cat /etc/NetworkManager/system-connections/wg0.nmconnection
That, or editing this file would display something similar to:
[connection]
id=wg0
uuid=adhf8673-67aw-90we-a5a5-dbd64480ae8c
type=wireguard
interface-name=wg0

[wireguard]
listen-port=41577
private-key=E0Gg4G98ZRBnH9JGIidCLLfeIM0t+cixH4061e/8S3c=

[wireguard-peer.mGlHOMit7ZLhQFIjQ2MuExGklixybTh0f5NzNELEdVk=]
endpoint=mywireguard.ddns.com:45731
persistent-keepalive=25
allowed-ips=0.0.0.0/0;::/0

[ipv4]
address1=10.1.1.2/32
method=manual

[ipv6]
addr-gen-mode=default
method=disabled
As we can see, this file has a similar .ini style but but with a distinctive format for NetworkManager profiles, following this format is fairly straightforward and the settings are mostly self-explanatory now that we know these terms. We have settings to identify this connection profile within NetworkManager, we also specify the type of connection and its interface name. Then we have the usual WireGuard settings like listen port and private key for this peer, and the other settings to define our WireGuard peers. Some key differences we should take in consideration is the general use of lowercase, no spaces, and the use of semicolon instead of comma for separating addresses in the allowed-ips setting. Each WireGuard peer is defined with its public key in each header, and the common settings for endpoint definition, timing for the persistent keepalive packet, and the allowed IPs list. Finally we get IPv4 and v6 definitions, with an address and method of address assignation. And yes, we can use IPv6 addresses with WireGuard if wanted, again we just need to keep inside the private address space (for IPv6 it is defined by the RFC 4193). IPv6 is usable with the regular tools as well so this is not exclusive of NetworkManager, but it is usually not needed unless trying to integrate an existing private network that was previously set up on IPv6.
On the peer definition of what would be our main internet sharing peer, we can see a significant change in the allowed-ips setting, using the 0.0.0.0/0 network definition for IPv4 and ::/0 for IPv6, we're telling WireGuard that all the network traffic is going to be routed through it, this is what effectively defines our full tunnel. And like we did in the previous example for our bouncing peer, that internet sharing peer also needs to have IP forwarding enabled and allowed in the firewall, and also needs to have NAT masquerade rules defined in the same way as we did there.
Another change comes in the endpoint definition, and here we're using the example domain mywireguard.ddns.com that can be assigned by a Dynamic DNS (DDNS) service like NO-IP or ChangeIP, which will keep our tunnel connection up even if the external IP address changes for some reason, like if it is dynamically assigned by our ISP. The regular WireGuard tools have a limitation in this feature, even if the DDNS service refreshes it correctly, WireGuard can't refresh this address change by itself and will usually drop the connections until the tunnel is reestablished with the refreshed domain. NetworkManager on the other hand keeps monitoring the domain for changes and can automatically refresh the address without needing to manually reset the tunnel, which is a great advantage over the manual tools if we need to keep a high availability like in this case for our Internet connection not to drop whenever the endpoint changes external IP address.
One big consideration that we need to take into account now that our entire Internet traffic is being tunneled through our VPN is domain and host name resolving. Up until now for direct point-to-point connections this has not been considered because we were exclusively using the private IP addresses of our peers, but most of the modern Internet depends of name resolving to function efficiently. WireGuard can manage this in one of two ways, either letting the functioning DNS resolving stack on the Internet sharing peer to have control of that, or define one of the peers as DNS server if it has that capability. One application of this is if for example one of the peers is a Pi-hole, which effectively is an ad-blocking DNS server, which would actually block all ad-serving domains in its blocklists for our entire VPN if setup as its DNS server.
NetworkManager's nmcli manual and importing set up is pretty straightforward, and usually doesn't add conflicting settings that can create issues with our other network connections, but in the rare case it does, or that maybe those conflicting settings may come from the use of third party/GUI tools that access NetworkManager's API, it is good to be aware that usually the most common settings that may create issues are either conflicting DNS servers for the VPN that clash with the system resolver, bad DNS search priorities (like for local domains) or auto-connect priorities in the VPN profile that's higher than the main network profile.
Once we have the setup completed we can just bring the tunnel up with:
# nmcli con up wg0
Another advantage for using NetworkManager is when we make modifications to our profile .nmconnection file, like for example to add a new peer, we don't have to tear down the connection to load up these changes. We do this by running the following command after making any change:
# nmcli con reload wg0
And then we apply the changes by calling the tunnel up again with # nmcli con up connection-name. This allows for a very brief downtime for our tunnel when applying new settings that is way shorter than when we use the commands wg-quick down/up for comparison.
Next Projects to Research
Complex network topologies are possible to create and control with a WireGuard VPN, beyond the simple point-to-point examples in this guide, it is possible to deploy point-to-site and site-to-site setups that let you integrate full separate networks on one fully enmeshed VPN like for example Tailscale can do. Usually this will require tweaking and adjusting your Allowed IPs lists in the devices that are providing the most direct connection between points and sites. Hopefully the basics acquired in this guide will be enough to further your research into setting up these more complex examples.
Closing Thoughts
If you're looking for total control over your data security there is probably no better tool than WireGuard to give you a very performant solution with great flexibility and scalability. Traditional VPN setups like IPSec or OpenVPN have their uses and functions, but once the concepts behind a WireGuard VPN are understood it is incredibly easy to deploy in many scenarios for many applications. Tailscale may streamline a lot of this setup process and even overcome the need of a public address for your endpoint peer, but you're still trusting them and their infrastructure with your data transfers. If this is a level of trust that you're not comfortable with your applications, currently nothing will give you better control and performance than your own WireGuard VPN.
Sources and Useful Links
- WireGuard - Archwiki
- Setup WireGuard VPN on Ubuntu 24.04 / Debian 13 / Rocky Linux 10 - Computing for Geeks
- Setting up a WireGuard VPN - Red Hat Documentation
- WireGuard Endpoints and IP Addresses - Pro Custodibus
- Troubleshooting WireGuard DNS Issues - Pro Custodibus
- Fixing WireGuard Subnet Conflicts: Why Your VPN Won't Route Traffic - eliobou
- Protocol & Cryptography - WireGuard.com
- Routing & Network Namespaces - WireGuard.com
- GitHub - pirate/wireguard-docs: 📖 Unofficial WireGuard Documentation: Setup, Usage, Configuration, and full example setups for VPNs supporting both servers & roaming clients
- MTU/MSS Decision Tree for WireGuard Deployments - Defguard blog
- WireGuard: allowed IPs - Unofficial WireGuard Documentation - MikroTik community forum
- WireGuard in NetworkManager - Thomas Haller's Blog
- WireGuard with NetworkManager: The Complete Guide to Bulletproof VPN setup - @Ptasiek in Medium
- Setting up Packet Forwarding with WireGuard and UFW - Ethan's Semi-Technical Blog
- vpn-wireguard - FreshTomato Wiki
- wg-tool: Wireguard configuration tool that simplifies managing wireguard vpn setups
- WireGuard for Enterprises - Tailscale
If you liked this guide, you can support us by sharing it to your interested communities and socials. You can also subscribe to the site for free and receive a non-spammy weekly newsletter with our best features. And finally you can also join our Discord server and share your feedback with us!



Comments ()